
Bring
life to your home with this enchanting 4x4x4 LED cube. From static to
flashing, chasing, or fading this cube can be programmed to display many
different types of 3D LED transitions. This customizable PCB LED cube
is super easy to make and fun to have in your home. Go ahead and create a
forest of these cubes using various color LEDs to enhance the beauty of
your Christmas Tree this Christmas.
This cube has 64 Blue LEDs
organized in 4 layers. These LEDs are wired up to an Arduino Nano. Each
LED can be addressed individually using Arduino IDE, enabling it to
display amazing 3D transitions!
There are hundreds of tutorials
of these cubes made using exposed metal wires and by using crazy
soldering techniques, which just gives me shivers. In this tutorial I'll
show you guys how to make this super simple 4x4x4 PCB LED cube "without
over complicating anything". With just basic soldering skills, you can
create this PCB cube and light up your living room making everyone
jealous.
Sponsors

PCBWay ships from china to most of the countries of the world within 3 to 7 business days. Talking about the quality, its absolutely mind-blowing.
Awards


My Project won "Best Deign" award at Cults3D
Submission: https://cults3d.com/en/3d-model/home/4x4x4-pcb-led-cube
and got featured on Instructables
Submission: https://www.instructables.com/4x4x4-PCB-LED-CUBE/
Components Required
For this project we need:
- 64 x Blue Color Round LEDs (plus some extra just in case you make a mistake)
- 4 x Blue Color Flat LEDs
- 4 x 100Ohm Resistors
- 8 x 4GX9 Pan Head Screws
- 1 x 220v to 5v Step Down Converter
- An AC Power Cord
- 1 x Arduino Nano
- A 3D Printer
- Acrylic Colors
- Custom Built PCBs
- 20 x Exposed Thick Copper Wires and
- An x Optional switch
** All the project related resources can be downloaded from my GitHub repository : https://github.com/tarantula3/4x4x4-LED-Cube.
Testing The LEDs

Before we start assembling our LED cube, it is a very good idea to test these LEDs.
Since few of the LEDs will remain absolutely inside the cube, so accessing them after the assembly will become an absolute nightmare. Hence a simple mistake can bring a lot of greif.
Using a coin cell, I tested all the 64 main LEDs and the 4 Square LEDs.
The Board

So, I designed two types of PCBs for this project.
One for the base and the other one that will be installed 4 times to create the top 4 layers of the cube. Both PCBs have "TOP" and "BOTTOM" written on them. The "Top" section faces up and the "Bottom" section faces down.

While assembling the cube, I will first solder the 16 copper wires to the "Top Section" of the base plate. Then I will solder the remaining 4 wires to the board. Each of these wires will connect to only one layer. Hence, all these wires are of different sizes. The 1st one from right connects to layer 1, next one to layer 2 and so on. Once all the wires are soldered to the "Top Section" of the base plate, I will one by one slide the LED meshes over these wires and solder them accordingly to form the top 4 layers.
Soldering The LED Mesh

So, this is what came in the mailbag. Thanks to PCBWay, the boards are very well fabricated and look absolutely amazing. The black color solder mask is adding to the beauty of the boards.
As discussed earlier we need 4 of the "LED Mesh Boards" and 1 board for the "Base".

One by one I added all the LEDs to the board. While soldering the LEDs, please make sure that they are all added to the "Top" side of the board. Once all the LEDs were in, I went ahead and soldered them to the board.
Soldering The Base

After sorting out the top layers, it was time for me to set up the bottom bit.
I started the setup by soldering the 4 x 100ohm resistors to the board. Then, I soldered the Arduino Nano to the board. Instead of soldering the Arduino Nano directly to the board, I used female pin headers to house the Arduino Nano Micro controller. Please make sure all these components are soldered to the "Bottom" side of the base plate.

After that, I one by one soldered all the copper wires to the base plate. While soldering the wires, please make sure you solder them to the "Top" side of the board.
After soldering the wires to the base plate, slide the 1st LED Mesh and solder all the wires to it. Then slide the 2nd one and so on. I left a 1.7cm gap between each layer and 1.2cm gap between the 1st layer and the base plate.

In this setup, the 4 wires that we saw earlier that connect to individual layers are soldered to the middle rail. However, in the final version I moved them to the outer rail to make the soldering process easy.
Coding

I found this sketch online, and then I edited it to work with my LED cube.
You can download the code from my GitHub repository (https://github.com/tarantula3/4x4x4-LED-Cube). The code is exactly the same as any other 4x4x4 LED cube code with some additional transitions that I added. I also found that the Arduino Nano freezes after a while. So, to keep the process going without any interruptions, I added a function to reboot the board after it completes one set of transitions.
3D Model

Using Microsoft 3D Builder I designed the base of the cube.
The onscreen 3D model is actually upside down.
On one of the sides, I left a hole for inserting the power chord. These groves are for the 4 x Flat Head LEDs.
The lid sits on top of the base and is screwed to the base using 4GX9 Pan Head Screws.
3D Printing

Once the 3D models were sorted, it was time for me to fire up my 3D printing oven and start printing these 3D models.
As we all know, 3D printing is the process that uses computer-aided design or CAD, to create objects layer by layer.
3D printing is not a new technology, its been there since the 1980's, when Charles W. Hull invented the process and created the first 3D-printed part. Since then, the field of 3D printing has grown exponentially and holds countless possibilities. The 3D printing process fascinates me a lot and I sometimes love to sit near my printer and watch these layers getting printed.

After extracting all the 3D printed bits, I sanded them to give them a nice and smooth texture.
Coloring

Using Acrylic Colors, I painted the body of the 3D printed base.
Assembling

Now the final bits.
I soldered the base-plate and the 4 x flat-head LEDs to the 220v-to-5v Step Down Converter. Then I pushed all the flat head LEDs through the groves that I created in the 3D printed base. Then using the 4GX9 Pan Head Screws I screwed the 3D printed base to the base plate.
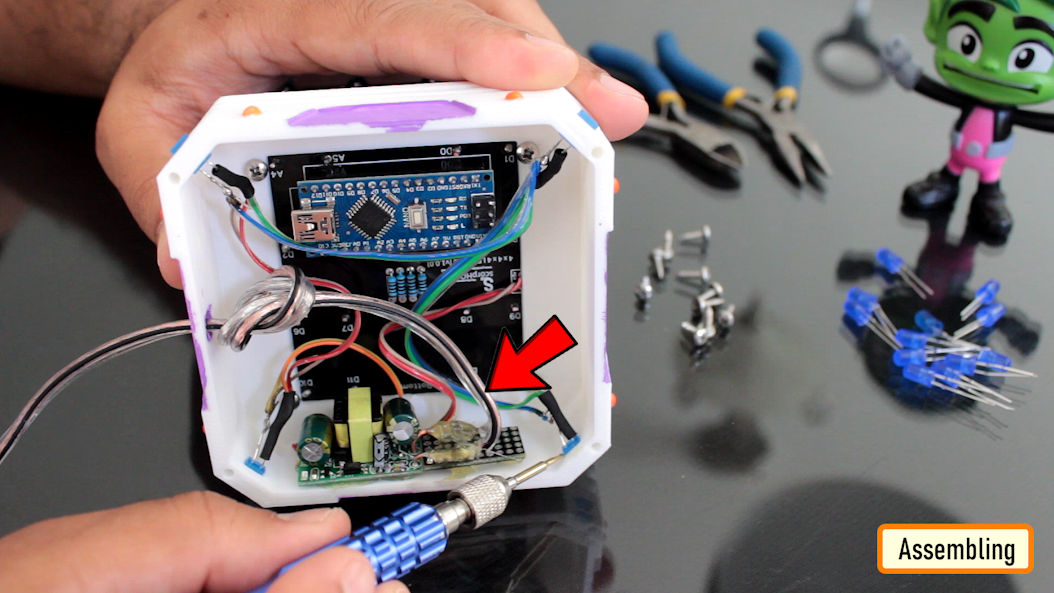
Next, I soldered the AC power-cord to the step-down converter and hot-glued it to one of the sides of the 3D printed base.
I created an acrylic box for the cube which will keep the LED Mesh dust free.
To conclude the assembly, I screwed the cover to the base. That's it, all done.
Final Demo

So, this is how my final setup looks like.
Do comment, and let me know if there are any scopes of improvement.
Thanks
Thanks again for checking my post. I hope it helps you.
If you want to support me subscribe to my YouTube Channel: https://www.youtube.com/user/tarantula3
Video: View
Full Blog Post: View
References
GitHub: View
Code: Download
Stl Files: Download
Gerber Files: Download
Support My Work
- BTC: 1Hrr83W2zu2hmDcmYqZMhgPQ71oLj5b7v5
- LTC: LPh69qxUqaHKYuFPJVJsNQjpBHWK7hZ9TZ
- DOGE: DEU2Wz3TK95119HMNZv2kpU7PkWbGNs9K3
- ETH: 0xD64fb51C74E0206cB6702aB922C765c68B97dCD4
- BAT: 0x9D9E77cA360b53cD89cc01dC37A5314C0113FFc3
- LBC: bZ8ANEJFsd2MNFfpoxBhtFNPboh7PmD7M2
- COS: bnb136ns6lfw4zs5hg4n85vdthaad7hq5m4gtkgf23 Memo: 572187879
- BNB: 0xD64fb51C74E0206cB6702aB922C765c68B97dCD4
- MATIC: 0xD64fb51C74E0206cB6702aB922C765c68B97dCD4
Thanks, ca again in my next tutorial
TAGS
----
4x4x4
LED Cube,4x4x4 PCB LED Cube,Simple LED Tester,LED Tester,coin cell,led
fader,3d led cube,PCB Cube,PCBWay,Microsoft 3D Builder,Microsoft,3D
Builder,rebooting Arduino Nano,soft reset Arduino Nano,4GX9 Pan
Head,Christmas Tree,Christmas Decoration,ardunio projects,top 10 arduino
projects,led projects,
Odysee: https://odysee.com/@Arduino:7/4x4x4-PCB-LED-CUBE:8
Cos: https://cos.tv/videos/play/56311646746350592
Rumble: https://rumble.com/v5ja7lp-4x4x4-pcb-led-cube.html


No comments