Arduino Based Parking Assistant V2
When life gives you bananas!!!!! Just eat them.
Necessity is the mother of inventions, and I won't deny that fact. Frankly speaking, this is the 2nd time I bumped into our garage wall since we moved into this new house. That's it, there would be no third time.
In this video, I am going to use an ultrasonic sensor to calculate the car's distance from the garage wall and display it using green, blue, yellow and red LEDs. The color of LEDs indicates whether to keep moving, slow down, stop or go back.
The total cost of the project is around $20 - $25.
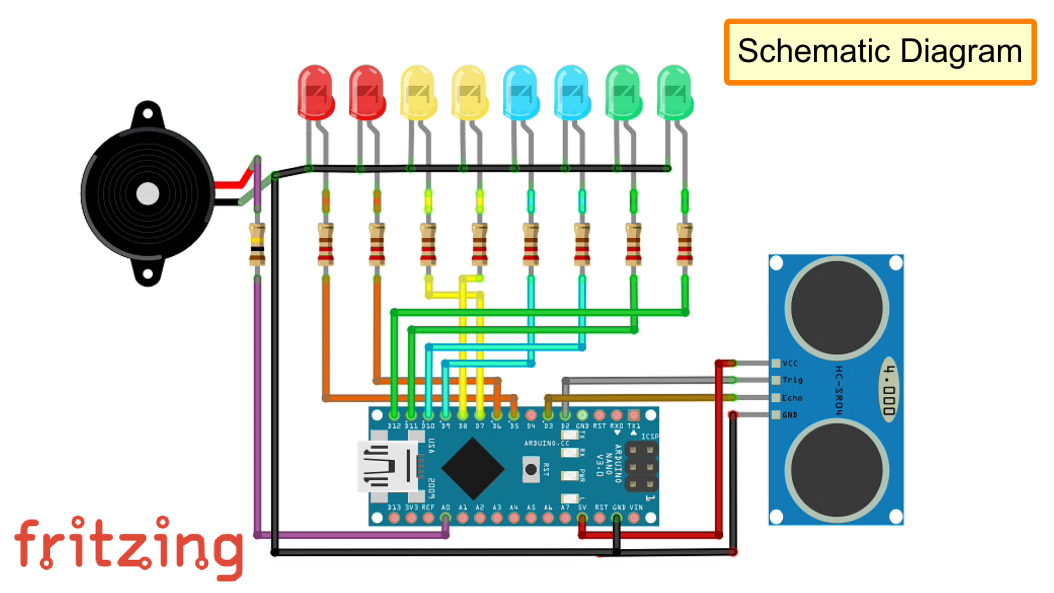
Schematic
---------------

For this project we need:
8 x Multi Colored LEDs
8 x 220ohm Resistors
1 x Arduino NANO
1 x HC-SR04 Ultrasonic Sensor
1 x Speaker and
1 x 100ohm Resistor
Lets start by connecting the LEDs to the Pin number D5 to D12 of the Arduino with a 200ohm resistor in between each of the pins.
Then, lets connect the speaker to A0 pin of the Arduino. The TRIG pin of the Ultrasonic Sensor connects to D2 and the ECHO pin connects to the D3 pins of the Arduino.
Finally, connect the VCC pin of the Ultrasonic Sensor to the 5V output of the Arduino and to finish the circuit connect all the -ve pins to the GND pin of the Arduino.
Components Assembly
---------------------------------

I will start by soldering the LEDs to the board. Red on top, then yellow followed by blue and green at the bottom.

You can use whatever color you want, totally depend on how you want to present it. The reason I chose these colors was to show the level of severity as the car approaches the wall. I could have even used a single color for the whole setup.

After soldering the LEDs I am soldering the 8 x 220ohm current limiting resistors to the back of the board.

Next, I am soldering the buzzer and the 100ohm resistor to the board.

After that, I am soldering 2 rows of Female Pin Header Strips to hold the Arduino.


Next, its time for me to solder the ultrasonic sensor to the bottom bit of the board.

Finally before de-attaching the bottom bit I am soldering the cables to the board.
Alright, so this is how it looks like. Now, lets look at the code in the next section.
The Code
--------------

Start the code by including the "NewTone.h" library and by defining the constants and the global variables that will be used throughout the code.
Then in the setup section define the pin modes.
Now, in the loop section calculate the "Distance" in inches by reading the value received from the Ultrasonic Sensor.
Then by checking the value of the "Distance" we will turn on or off the LEDs based on how far the object is. If the distance is greater than 200 turn all the LEDs and the buzzer off as the object is out of range.
Next bit of the code checks if the object is currently stationary. It compares the value of current distance with the previous distance and if the values are same (object hasn't moved) it increments a counter. If the object moves any-time during this process the counter is reset to 0.
When the counter reaches 20 all the LEDs are turned off.
And finally create the function that turns off all the LEDs and the buzzer.
Demo
--------

Using my Land Rover R1V2 I am going to demonstrate the project to you guys. As you can see the LED indicators go from green to red as the rover approaches the ultrasonic sensor. Yes!! mission accomplished.
Thanks
-----------
Thanks again for checking my post. I hope it helps you.
If you want to support me subscribe to my YouTube Channel (https://www.youtube.com/user/tarantula3).
Thanks, ca again in my next tutorial.
JLCPCB - 2$ For PCB Prototype: https://jlcpcb.com
V1 Blog: https://diyfactory007.blogspot.com/2018/04/diy-arduino-based-car-parking-assistant.html
V2 Blog: https://diy-projects4u.blogspot.com/2019/12/diy-arduino-based-parking-assistant-v2.html
Teaser: https://youtu.be/UoEEZBV6NOg
Video V1: https://youtu.be/LQGhprwuHe0
Video V2: https://youtu.be/MqJxUf3Cugg
Code: https://hacksterio.s3.amazonaws.com/uploads/attachments/1033024/code_Ulqrg3HcoI.7z
NewTone Library: https://hacksterio.s3.amazonaws.com/uploads/attachments/1033019/newtone_v1_0_t8CVDrTlf7.zip
Gerber File: https://hacksterio.s3.amazonaws.com/uploads/attachments/1033018/gerber_parking_assistant_v2_ohaVqkGork.zip
Schematic: https://hacksterio.s3.amazonaws.com/uploads/attachments/1031756/1_fFRSIQgYXr.png
Sketch: https://hacksterio.s3.amazonaws.com/uploads/attachments/1033020/parking-assistant-v2_20191117045212_KKbiCub1mx.png
Fritzing: https://hacksterio.s3.amazonaws.com/uploads/attachments/1033021/schema_8IKRm3rrwx.fzz
Necessity is the mother of inventions, and I won't deny that fact. Frankly speaking, this is the 2nd time I bumped into our garage wall since we moved into this new house. That's it, there would be no third time.
In this video, I am going to use an ultrasonic sensor to calculate the car's distance from the garage wall and display it using green, blue, yellow and red LEDs. The color of LEDs indicates whether to keep moving, slow down, stop or go back.
The total cost of the project is around $20 - $25.
Video: https://www.youtube.com/watch?v=MqJxUf3Cugg
Schematic
---------------

For this project we need:
8 x Multi Colored LEDs
8 x 220ohm Resistors
1 x Arduino NANO
1 x HC-SR04 Ultrasonic Sensor
1 x Speaker and
1 x 100ohm Resistor
Lets start by connecting the LEDs to the Pin number D5 to D12 of the Arduino with a 200ohm resistor in between each of the pins.
Then, lets connect the speaker to A0 pin of the Arduino. The TRIG pin of the Ultrasonic Sensor connects to D2 and the ECHO pin connects to the D3 pins of the Arduino.
Finally, connect the VCC pin of the Ultrasonic Sensor to the 5V output of the Arduino and to finish the circuit connect all the -ve pins to the GND pin of the Arduino.
Components Assembly
---------------------------------

I will start by soldering the LEDs to the board. Red on top, then yellow followed by blue and green at the bottom.

You can use whatever color you want, totally depend on how you want to present it. The reason I chose these colors was to show the level of severity as the car approaches the wall. I could have even used a single color for the whole setup.

After soldering the LEDs I am soldering the 8 x 220ohm current limiting resistors to the back of the board.

Next, I am soldering the buzzer and the 100ohm resistor to the board.

After that, I am soldering 2 rows of Female Pin Header Strips to hold the Arduino.


Next, its time for me to solder the ultrasonic sensor to the bottom bit of the board.

Finally before de-attaching the bottom bit I am soldering the cables to the board.
Alright, so this is how it looks like. Now, lets look at the code in the next section.
The Code
--------------

Start the code by including the "NewTone.h" library and by defining the constants and the global variables that will be used throughout the code.
Then in the setup section define the pin modes.
Now, in the loop section calculate the "Distance" in inches by reading the value received from the Ultrasonic Sensor.
Then by checking the value of the "Distance" we will turn on or off the LEDs based on how far the object is. If the distance is greater than 200 turn all the LEDs and the buzzer off as the object is out of range.
Next bit of the code checks if the object is currently stationary. It compares the value of current distance with the previous distance and if the values are same (object hasn't moved) it increments a counter. If the object moves any-time during this process the counter is reset to 0.
When the counter reaches 20 all the LEDs are turned off.
And finally create the function that turns off all the LEDs and the buzzer.
Demo
--------

Using my Land Rover R1V2 I am going to demonstrate the project to you guys. As you can see the LED indicators go from green to red as the rover approaches the ultrasonic sensor. Yes!! mission accomplished.
Thanks
-----------
Thanks again for checking my post. I hope it helps you.
If you want to support me subscribe to my YouTube Channel (https://www.youtube.com/user/tarantula3).
Thanks, ca again in my next tutorial.
JLCPCB - 2$ For PCB Prototype: https://jlcpcb.com
V1 Blog: https://diyfactory007.blogspot.com/2018/04/diy-arduino-based-car-parking-assistant.html
V2 Blog: https://diy-projects4u.blogspot.com/2019/12/diy-arduino-based-parking-assistant-v2.html
Teaser: https://youtu.be/UoEEZBV6NOg
Video V1: https://youtu.be/LQGhprwuHe0
Video V2: https://youtu.be/MqJxUf3Cugg
Code: https://hacksterio.s3.amazonaws.com/uploads/attachments/1033024/code_Ulqrg3HcoI.7z
NewTone Library: https://hacksterio.s3.amazonaws.com/uploads/attachments/1033019/newtone_v1_0_t8CVDrTlf7.zip
Gerber File: https://hacksterio.s3.amazonaws.com/uploads/attachments/1033018/gerber_parking_assistant_v2_ohaVqkGork.zip
Schematic: https://hacksterio.s3.amazonaws.com/uploads/attachments/1031756/1_fFRSIQgYXr.png
Sketch: https://hacksterio.s3.amazonaws.com/uploads/attachments/1033020/parking-assistant-v2_20191117045212_KKbiCub1mx.png
Fritzing: https://hacksterio.s3.amazonaws.com/uploads/attachments/1033021/schema_8IKRm3rrwx.fzz


No comments:
Post a Comment